


![[Shellcode development] Resolve function address using IAT instead of EAT - Part 1 (EN)](/images/post/shellcode/Shellcode-article.jpg)
Hello, readers!
Today we offer you a post that we are sure you will find very interesting and useful.
In this article, we are going to review the different structures that exist in a PE file. Specifically, those that are in charge of specifying which functions are to be imported once this file is executed. imported once this file is executed, and also those that are in charge of specifying which functions a DLL exports. to specify which functions a DLL exports.
But first, let's put you in context. The process of writing this series of articles began during the execution of the EXP-301 course laboratories. During one of the modules, the development of custom shellcodes is covered in depth, although during the during the module, only the use of the EAT table of the different DLLs imported into a process to locate the imported into a process to locate interesting functions that will allow, later on, to develop other later on, to develop other actions, such as executing commands, opening sockets, etc.
A very usual approach would be the following:
To do those actions, the following structure must be parsed:
typedef struct _IMAGE_EXPORT_DIRECTORY {
ULONG Characteristics;
ULONG TimeDateStamp;
USHORT MajorVersion;
USHORT MinorVersion;
ULONG Name;
ULONG Base;
ULONG NumberOfFunctions;
ULONG NumberOfNames;
ULONG ddressOfFunctions;
ULONG AddressOfNames;
ULONG AddressOfNameOrdinals;}
IMAGE_EXPORT_DIRECTORY, *PIMAGE_EXPORT_DIRECTORY;
This structure stores a pointer to three different and important arrays, which are the following:
AddressOfFunctions AddressOfNames AddressOfNameOrdinals
As we explained before, you need to carry on with the following steps:
Some posts explain very deeply this process, this is one i like so much.
https://xen0vas.github.io/Win32-Reverse-Shell-Shellcode-part-2-Locate-the-Export-Directory-Table
During the practice of this technique, an idea came to my mind. Why not use IAT of the exploited process, instead of using the EAT of the Kernel32/Kernelbase DLL?
First of all, it must be explained that almost every process that is running in a Windows environment, has a Kernel32/Kernelbase DLL image loaded in memory. So, it’s not a fantasy to think that we can use the IAT of the exploited process to resolve those functions.
During this post, we will be working with two structures consisting on the subsequent.
The first is _IMAGE_IMPORT_DESCRIPTOR and holds information about the name of the DLL, a pointer to the IAT, and a pointer to the names of the functions imported.
This is the definition:
typedef struct _IMAGE_IMPORT_DESCRIPTOR {
_ANONYMOUS_UNION union {
ULONG Characteristics;
ULONG OriginalFirstThunk;
} DUMMYUNIONNAME;
ULONG TimeDateStamp;
ULONG ForwarderChain;
ULONG Name;
ULONG FirstThunk;
} IMAGE_IMPORT_DESCRIPTOR, *PIMAGE_IMPORT_DESCRIPTOR;
And the second structure is the own IAT (_IMAGE_IMPORT_BY_NAME), that as we will see during this post, is different when the PE image is loaded in memory than when it resides on disk.
In disk it has the following definition:
typedef struct _IMAGE_IMPORT_BY_NAME {
USHORT Hint;
UCHAR Name[1];
} IMAGE_IMPORT_BY_NAME, *PIMAGE_IMPORT_BY_NAME;
_IMAGE_IMPORT_BY_NAME is usually known as the IAT.
All the work will be done with WinDBG, but for display reasons, sometimes we will use x32dbg to inspect memory.
To begin, we load our program (asm_iat_parse.exe) in windbg emulating a suspended process.
We will see how to calculate the address of IAT, and we will use those steps to compare a process that has not been fully initialized yet with a running process.
For this we use the following command line windbg.exe -le:ntdll.dll asm_parse_iat.exe
This command line will open asm_parse_iat.exe before RtlUserThreadStart is started, so IAT of the image is still intact.
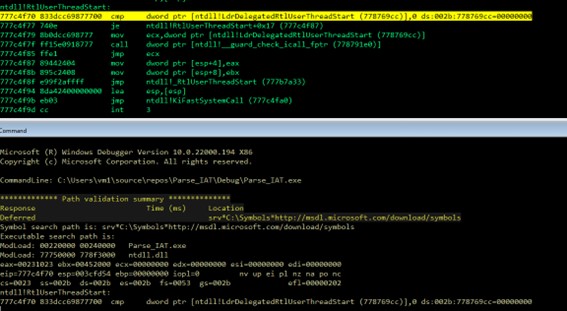
With this, let’s proceed to look for the IAT manually using windbg.
We will access the _TEB structure, for that we use the fs:[0] register.
As we can see, _TEB has a pointer to _PEB in position 0x30
dt _TEB
ntdll!_TEB
+0x000 NtTib : _NT_TIB
+0x01c EnvironmentPointer : Ptr32 Void
+0x020 ClientId : _CLIENT_ID
+0x028 ActiveRpcHandle : Ptr32 Void
+0x02c ThreadLocalStoragePointer : Ptr32 Void
+0x030 ProcessEnvironmentBlock : Ptr32 _PEB
+0x034 LastErrorValue : Uint4B
+0x038 CountOfOwnedCriticalSections : Uint4B
+0x03c CsrClientThread : Ptr32 Void
+0x040 Win32ThreadInfo : Ptr32 Void
So we need to read the content of fs:[0x30] to access to ProcessEnvironmentBlock structure
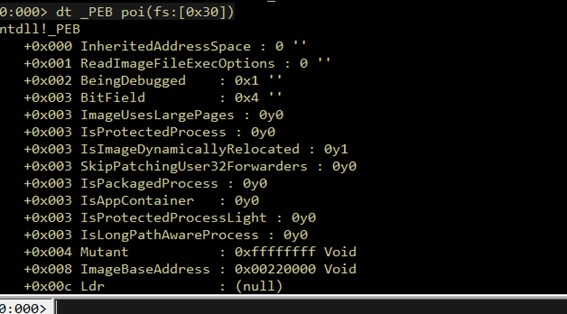
Having the base address of the image, we will parse _IMAGE_DOS_HEADER But before going on, let’s keep the address of the ImageBase in a temporary register of WinDBG
r @$t0 = poi(poi(fs:[0x30])+0x008)
This will be used later to calculate other addresses that are relative to the imageBase direction. Using this we don’t need to hardcode addresses and this technique is scalable to other binaries.
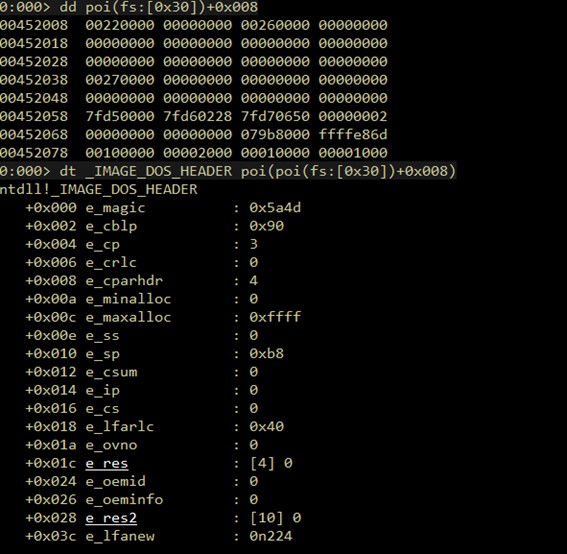
Now we can calculate the offset to _IMAGE_NT_HEADERS, using the position 0x30 of _IMAGE_DOS_HEADER, which stores an offset to _IMAGE_NT_HEADERS and adding the offset to our temporary register

Consequently, we will access _IMAGE_OPTIONAL_HEADER->DirectoryEntry, to get the address of _IMAGE_OPTIONAL_HEADER. We use _IMAGE_NT_HEADERS->OptionalHeader which is stored in _IMAGE_NT_HEADERS+0x030
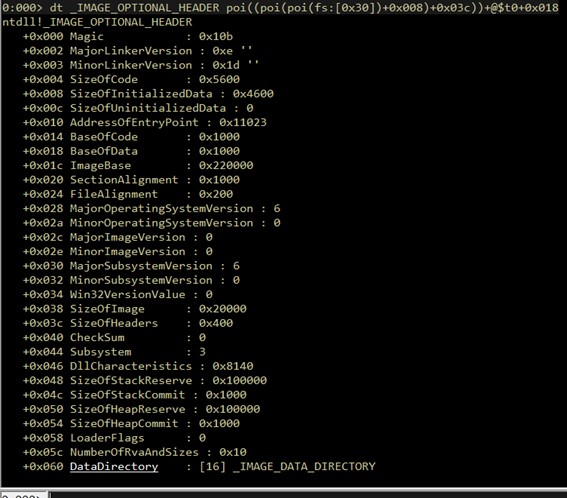
And to finish, we just need to get the address of the DataDirectory array, which has in the position 1 (DataDirectory[1]) the address of _IMAGE_IMPORT_DESCRIPTOR.
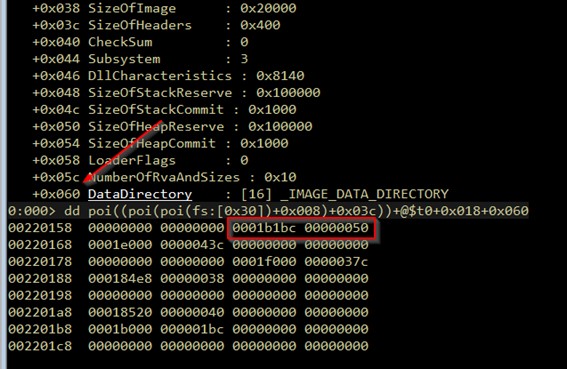
To clarify, we must say that to access _IMAGE_IMPORT_DESCRIPTOR we shall access the position 1 of DataDirectory, this array is a structure described as follows.
0:000> dt _IMAGE_DATA_DIRECTORY
ntdll!_IMAGE_DATA_DIRECTORY
+0x000 VirtualAddress : Uint4B
+0x004 Size : Uint4B
So we have to access DataDirectory+0x8 to get the relative address of _IMAGE_IMPORT_DESCRIPTOR, and later this will be added to our temporary register (stored ImageBase) to get the structure.
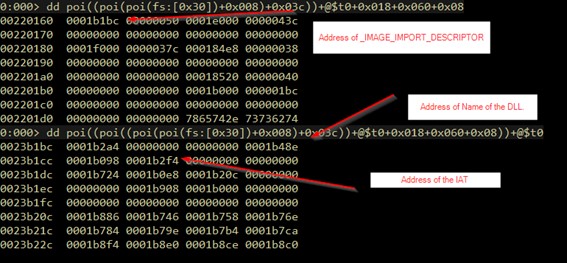
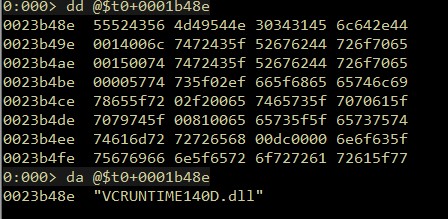
As a result, with this structure located, we can resolve the name of the DLL, which in this case is VCRUNTIME140.dll
And we can also get the address of the IAT, which in this case is the same for OriginalFirstThunk and FirstThunk. This happens because the process is not fully initialized, but once the process runs, the FirstThunk will point to function addresses and OriginalFirstThunk will point to IAT (_IMAGE_IMPORT_BY_NAME)
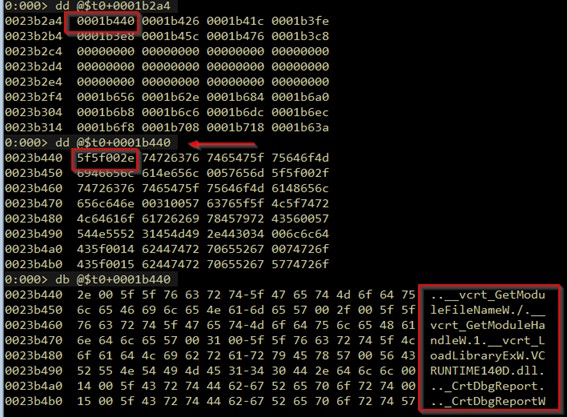
After the process is initialized this array will store the same data than now, but the FirstThunk, which is in _IMAGE_IMPORT_DESCRIPTOR+0x10 will have the address of the functions imported, ordered exactly like in _IMAGE_IMPORT_BY_NAME (OriginalFirstThunk)
This diagram is a graphical explanation of that idea.

We can see how those addresses are modified when the process is loading, but instead of using WinDBG, we will use x32dbg, and we will set a hardware breakpoint at FirstThunk addresses. With this we can observe how the IAT array is overwritten with the real addresses of the functions.

The previous image shows how the iat points to the _IMAGE_IMPORT_BY_NAME array before being overridden by the loader, and the next one shows how this override the process has been initialized.

Finally, we see this address point to the GetModuleFileName function, which as we saw before, is the first one that is imported by the executable.
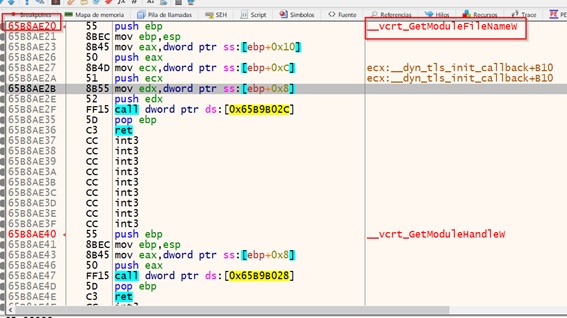
We have seen how import structures (arrays) can be parsed to obtain the index (position) of the name of a function in that array, and use this to locate the index (position) of the name of a function in that array, and use this to finally locate the actual the actual address of that function in the IAT.
Compared to the possibility of resolving functions by parsing the EAT of a DLL, this method is much simpler, because it saves steps and difficulty, which at the time of making a shellcode is always interesting, because our code is always which at the time of making a shellcode is always interesting, because our code will be smaller and more efficient. will be smaller and more efficient.
In the next parts of this series we will see how to implement this in C++ and, finally in assembler, using it to execute code in a real environment.
The code is published in: https://github.com/waawaa/Exploiting-TIPS/
And that concludes this analysis on PE structure review! We hope you have found it useful and interesting, and that you share it.
See you soon!
References:
